Showing posts with label Side dishes. Show all posts

Tuesday, June 25, 2013

Creamed Corn with Bacon

I'm convinced that if you put "with bacon" in the title of almost any recipe, more people will make it!  Don't you agree?  Creamed Corn sounds good and all, but Creamed Corn with Bacon....much better!

I've got a fabulous straight forward Creamed Corn recipe on here already, but if you love bacon (& onions and garlic and jalapenos!), this is the one for you!  We like to serve it with our Chicken Cordon Bleu as a side dish, but I could eat it as a main dish...which is what I usually do for lunch the next day with the leftovers.  Heat up a big bowl and dig in....y.u.m!  It is also a perfect side to go with any grilling you'll be doing throughout the summer, but just know, it may just be the hit of the show instead of your main dish!  It's a spotlight hog!:)

Creamed Corn with Bacon
10 strips of bacon
1 yellow onion, diced
1 jalapeno, diced
1 clove of garlic, pressed or minced
3 cups frozen sweet kernel corn
8 oz. cream cheese
1/2 cup heavy whipping cream
Salt & pepper to taste

Cook bacon in a large skillet over medium heat until crispy.  Remove to a paper towel lined plate to cool.  Drain bacon grease, leaving about 2 tablespoons in the skillet.

Add the onion, jalapeno (remove seeds and ribbing before dicing if you like less heat.  That's what I did and it was perfect!), and garlic & cook until the onion is translucent.  Add the corn and cook until it is warmed through, about 6-7 minutes.  Reduce heat to low.  

Break cream cheese until chunks and add to the corn mixture along with the heavy cream, salt and pepper.  Stir until cream cheese has melted and incorporated with the corn.  

Place corn in a serving bowl and top with bacon pieces. 

Tuesday, January 8, 2013

Ranch Roasted Red Potatoes

School started today for my family.  It's been such a nice break, but it's so great to get back into the swing of things.  Schedules are a good thing! Too many late nights and early mornings (by the kids...not me, I've been sleeping in!) makes for some not-so-much-fun-to-be-around kiddos!:)

 I think I about ate my way into a chocolate coma as well...I did way too much bingeing on sweets.  But the last couple of days I've been craving celery like crazy.  My family thinks that's weird...I think that's my bodies way of counteracting all the crap I've been eating.

These would also do the trick I think.  They are so savory and delicious.  Cook them a little longer to get them nicely browned and crunchy if that's what you like.  We opted for soft, tender potatoes this time, but we like the crunchy ones too.;)  We have another Roasted Red Potatoes recipe that uses an onion soup mix that is also delicious...I really don't know which I like better!

Ranch Roasted Red Potatoes


1/4 cup olive oil
3 Tablespoons or 1 package Hidden Valley Ranch Dressing Mix
2 pounds red potatoes

Wash potatoes well.  Cut into 1 inch pieces.  Place in a large bowl with a lid or a large ziplock baggie.  Drizzle the oil over potatoes and add the ranch dressing mix.  Place lid on bowl (or zip baggie shut) and shake until potatoes are evenly covered.

Transfer potatoes to an ungreased baking pan.  They look so pretty!


Bake at 450 degrees for 30-35 minutes or until they are tender and browned.

Monday, November 5, 2012

Not Your Mama's Green Bean Casserole

Not too long before Thanksgiving is upon us, so I figured we'd better get movin' on some good Thanksgiving recipes.

I have never been a fan of the traditional green bean casserole that everyone seems to have with their Thanksgiving dinners, so when I saw this recipe a couple of years ago I knew I needed to try it.  And I'm so glad I did!  IT. IS. DELICIOUS!!!

You will make it year after year after year instead of the mushroom soup/french onion kind out there.  I'm usually a turkey, potatoes and roll kind of Thanksgiving dinner gal, that's all I really need to be happy, but this casserole is now on that list!

Stay tuned this week for my favorite Turkey recipe...and next week you'll be in PIE heaven when we do a week of pies as we gear up for our "We're Thankful for Pie Night"!!  And here's a link to last years "Pie Night"

Not Your Mama's Green Bean Casserole
PRINT RECIPE

Topping:
2 medium onions, thinly sliced
1/4 cup flour
2 tablespoons panko bread crumbs
1 teaspoon kosher salt

Beans:
1 pound fresh green beans, rinsed and trimmed
1 gallon water
2 tablespoons kosher salt

Sauce:
2 tablespoons unsalted butter
12 ounces mushrooms, sliced thinly
1 teaspoon kosher salt
1/2 teaspoon ground pepper
2 cloves garlic, minced
1/4 teaspoon freshly ground nutmeg
2 tablespoons flour
1 cup chicken broth
1 cup half and half

Preheat oven to 475 degrees.

Combine the onions, flour, panko and salt and toss to combine.  Spray a cookie sheet with nonstick spray and spread the onion evenly on the pan.  Bake until golden brown about 30 minutes, tossing every 10 minutes.  When browned, remove and set aside until ready to use.

Turn the oven heat down to 400 degrees.

While the onions are cooking, prepare the beans.  Bring a gallon of water and 2 tablespoons of salt to a boil in a large saucepan.  Blanch for 5 minutes.  Drain the beans and plunge them into a large bowl of ice water to stop them from cooking more.  Drain and set aside.

Melt the butter in a skillet over medium-high heat.  Add the mushrooms, salt and pepper and cook, stirring occasionally, about 4 to 5 minutes.  Add the garlic and nutmeg and cook for another 1-2 minutes.  Sprinkle the flour over the mushroom mixture and stir to combine.  Cook for 1 minute.  Add the broth and simmer for 1 minute.  Add the half-and-half and cook until the mixture thickens, about 6-8 minutes.

Remove from the heat and stir in 1/4 of the onions and all of the green beans.  Top with the remaining onions.  Bake approximately 15 minutes.  Remove and serve immediately.

Wednesday, July 18, 2012

Loaded Twice Baked Potatoes

We're home from our vacation.  It was a simple and wonderful one this year.  We had spent so much money this year already on travel (Kentucky for my Grandma's funeral & Tennessee with my 2 boys for their DI competition) that we weren't able to do anything extremely expensive.  So, we ended up just spending a week at my husbands families home & then a week down at my family's cabin.  IT WAS WONDERFUL!!  I'll take that kind of vacation anytime!  Actually we do that almost every summer...we were just able to spend more time at the cabin than we usually do.  It was so nice to to worry about blogging, facebook, pinterest, and all things electronic!  What a nice break!  (my husband liked that break too...he says I spend way too much time on the computer anyway!:))

But we're home now and going to get back into getting you fabulous recipes all week long!

This is one of our favorites and I don't make it near often enough for our liking!!:)

Loaded Twice Baked Potatoes
Recipe from The Pioneer Woman
8 potatoes, washed
1 cup butter, sliced into pieces
1 cup real bacon pieces (fry your own or buy it from the store)
1 cup sour cream
1/4 teaspoon seasoned salt
1 cup shredded cheddar cheese, plus 1/2 cup for topping
pepper to taste
1 green onion, sliced

Wash potatoes well with skins on.  Place potatoes in 400 degree oven without covering them in tinfoil, just the plain ol' potato all by itself.  This will help the skins hold their shape after they are hollowed out.  Bake for 1 hour and 15 minutes or until done. 

Just before they are ready to be removed from the oven, place butter, bacon, and sour cream in a large mixing bowl.  When the potatoes are finished, cut them in half lengthwise (use a towel to hold the potato while you are doing this...they are extremely hot!) and using a large spoon scoop the insides into the bowl with the butter, bacon and sour cream.  Don't scrape the potato all the way to the skin, leave a little bit of potato there to help hold it's shape.

Place hollowed out potatoes on a baking sheet.

Mash potatoes until desired consistency.  I like them a little chunky, but you can mash them smooth if that's your preference.  Add the seasoned salt, 1 cup of cheddar, and pepper, and mix.  Add the green onion and mix.

Fill each potato skin with mashed potatoes.  Sprinkle cheese on top and bake at 350 for 15-20 minutes or until heated through.

Monday, July 9, 2012

Lime Pineapple Jello Fluff

I hope everyone had a wonderful 4th of July! 

It is one of my favorite days of the year.  My wonderful husband was born on that day on the bicentennial of America's birthday...what an awesome birthday, huh! 

When he was little he thought everyone was celebrating his birthday.  They'd have a special parade and fireworks just to celebrate him!:)

And this is one of his favorite side dishes. 

It is especially wonderful during these summer months!  Nice and light and yummy!

Lime Pineapple Jello Fluff
1 carton (16 oz.) whipped topping
1 pint cottage cheese
1 small package lime jello
1 can crushed pineapple, well-drained

Mix all ingredients together well and refigerate for about 30 minutes before serving.

Friday, June 22, 2012

Creamed Corn

If you have any family members that don't like cream cheese, this is not the dish for you!!  That being said, I'm a "cream cheese makes everything better" kind of person so I LOVED this dish!

My 11 year old Caleb (the non-cream cheese lover) took one bite and wasn't about to eat any more.  Being the awesome mother I am....pause for the lightening bolt to strike....I told him he could not have anymore dinner until he ate 5 more bites of the corn. 

He did pretty good with the first couple of bites, but by the time he got to his last bites he was dry heaving!  I though we were going to have a lovely mess all over the table to clean up!  Sorry...I know this is a recipe blog & that puking is about the last thing you want to read about here.  Especially since I"m trying to convince you that this ones a winner and that you need to try it!

Sorry, again.

Don't let my son's reaction sway you, it really is a wonderful dish that goes really well with any summer-time grillin' you'll be doing!

Creamed Corn
Recipe adapted from Blue Bonnets & Brownies
2 pounds frozen sweet corn
1 package (8 oz.) cream cheese
1/4 cup butter (1/2 stick)
1/3 cup heavy whipping cream
2 Tablespoons sugar
1/2 teaspoon pepper
1/4 teaspoon salt

Throw all ingredients into your crockpot.  (Yes, it really is that easy!)  Cook on low for at least 4 hours.  Give it a good stir & serve!  YUMMY!

Tuesday, June 19, 2012

Loaded Baked Potato Salad

This was the "TO DIE FOR" potato salad that was served for Father's Day at our house.  I must have heard that phrase a bazillion times during dinner from my Eli.  If you haven't guessed yet....he really liked it!:)  As did the rest of the family.  It was a big hit!  We served it with Hawaiian Beef and creamed corn (recipe to come later this week).   It was a "TO DIE FOR" dinner!!

As long as you remember to bake your potatoes ahead of time, this salad is so quick!  I always hate potato salads because you have to wait for the potatoes to cool to eat (unless you like warm potato salad...GROSS...hope I didn't offend anyone!:)), but in this one they are already cooked so you can just throw everything together and it's ready to go!

And it's "TO DIE FOR!!!"

Loaded Baked Potato Salad
Recipe from Mels Kitchen Cafe

4-5 large russet potatoes, baked, cooled & chilled
3/4 cup mayonnaise (can use light)
1/2 cup sour cream (can use light)
4 tablespoons lowfat buttermilk
1/2 teaspoon celery seeds
1/4 teaspoon pepper
1/4 teaspoon salt
6 ounces cheddar cheese, cubed small
4 green onions, thinly sliced
8-10 slices bacon, cooked and chopped

Slice the chilled, baked potatoes into 1/2 inch pieces.  (You can peel them if you'd like, but we really liked it with the skins on...and it's less work!)  Place them in a large bowl. 

In a small bowl combine the mayo, sour cream and buttermilk.  Add the celery seeds, salt & pepper and mix in.  Pour over the potatoes and carefully stir to combine (you don't want a mashed potato salad). 

Add the cheese, onions, and bacon and mix gently to combine.  Cover and refrigerate until ready to serve.

Thursday, May 24, 2012

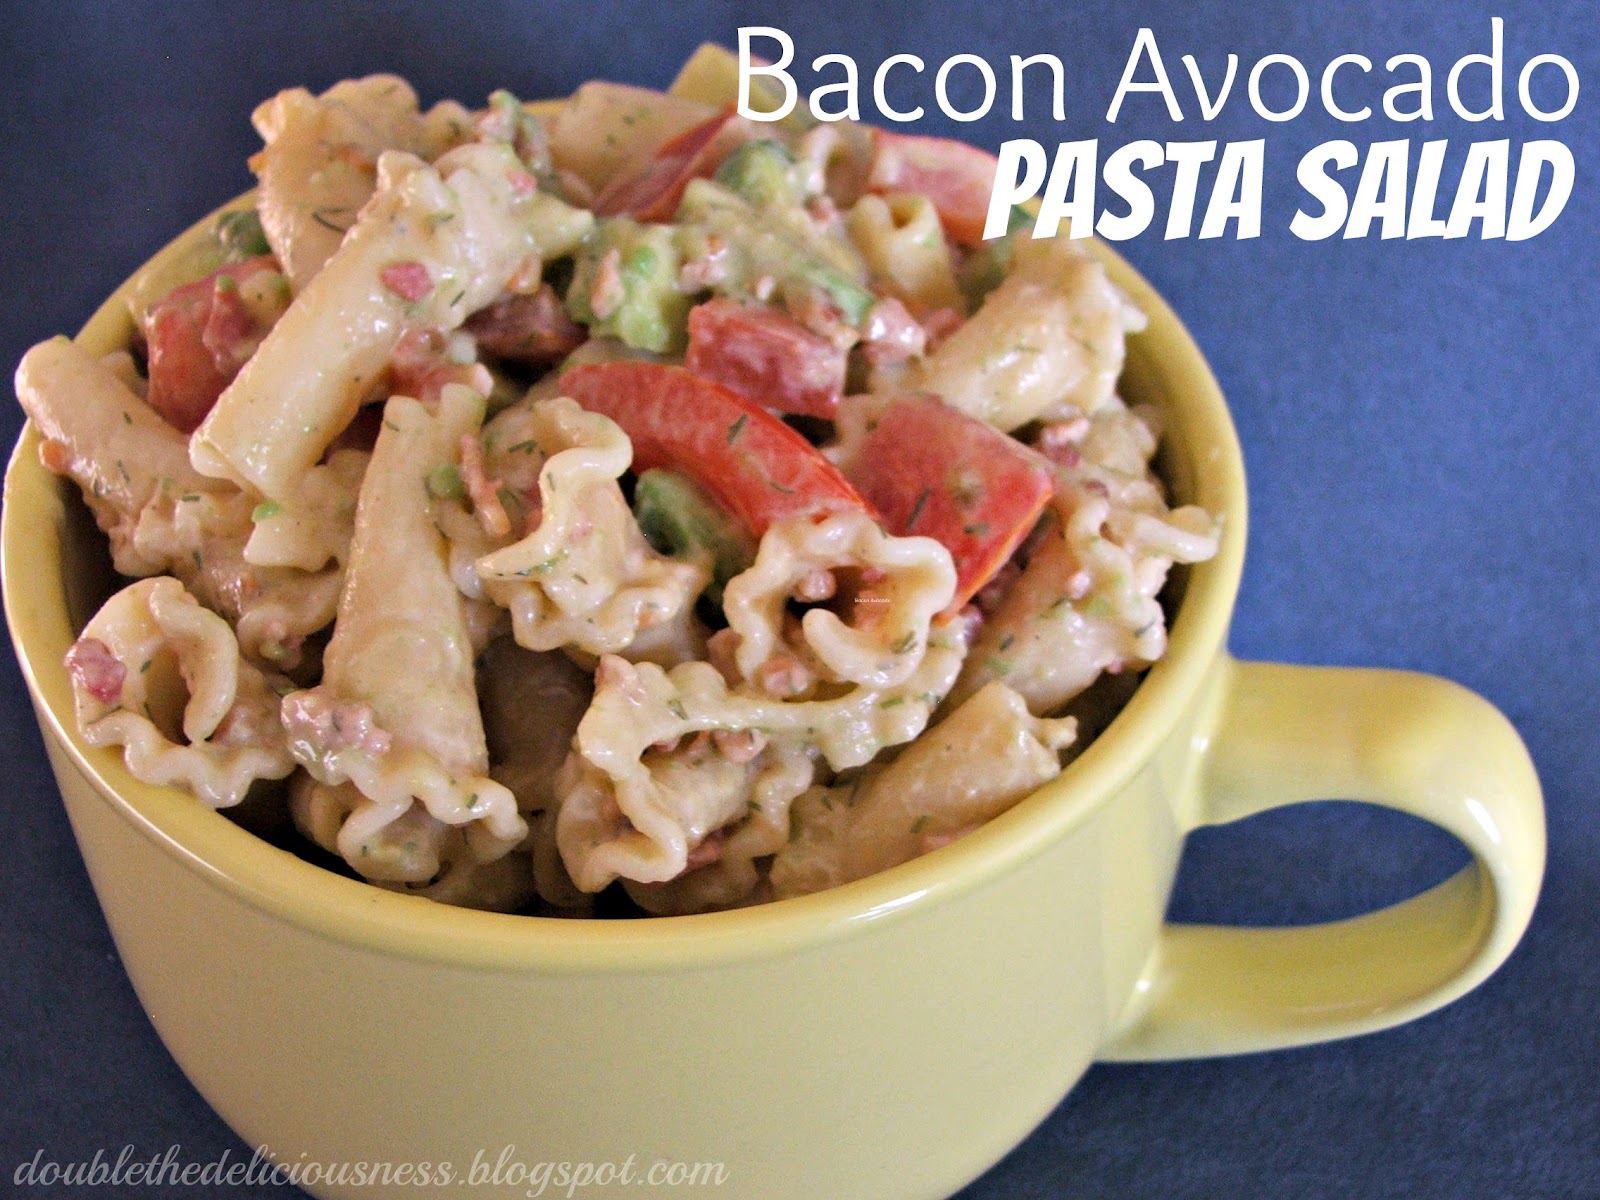
Bacon Avocado Pasta Salad

This recipe (along with many other pasta salad dishes) is one of the reasons I love summer time!

This salad got rave reviews from my husband.  Some of the kids liked it, but Eli told me it would be better without the tomatoes or avocado, but what does he know, he's only 9!!

This would be a perfect summer pot-luck salad to go with any BBQ's you've got planned!  Trust me, you'll LOVE it!

Well, that is if you like tomatoes and avocados.

Bacon Avocado Pasta Salad
Recipe adapted from Life's Ambrosia
1 pound campanelle pasta (or other variety, but I love the campanelle...SO CUTE!!)
1 cup mayonnaise
juice of 1 lemon
1 teaspoon kosher salt
2 cloves garlic, pressed or minced
1/2 teaspoon white pepper
1 1/2 teaspoons dried dill
3 large tomatoes, cut into bite size pieces (or cherry tomatoes, halved)
2 avocados, cut into bite size pieces
1 bag (3 oz.) real bacon peices

Cook pasta according to package directions.  Drain & then run under cold water to cool it down. 

In a large bowl, combine the mayo, lemon juice, salt, garlic, pepper, and dill.  Stir in the cooked pasta, tomatoes, avocado and bacon pieces, and toss to combine.  Refrigerate for 30 minutes before serving.

Monday, May 21, 2012

Lime Cilantro Rice with Pineapple

We're on our way!!  It has been one of the longest months of my life, but I'm pretty excited to spend this week with my Caleb & Eli in Tennessee.  What a journey it will be!  Wish us safe travels & luck!:)

Since it's grillin' season I thought I'd give you some wonderful grillin' menu items this week (and a cupcake recipe...what can I say?!)

This rice goes so well with grilled chicken or fish.  Add in some watermelon and you've got yourself a wonderful summer meal!

Lime Cilantro Rice with Pineapple
Recipe from Our Best Bites
1 cup long grain rice
2 cups water
2 tablespoons real butter
juice from 1 lime
1 (8 oz.) can crushed pineapple, drained
1/2-3/4 cup chopped fresh cilantro
Kosher salt and black pepper to taste

In a large saucepan, combine the rice and water.  Bring it to a boil over high heat and then reduce the heat, cover and allow to simmer for 20 minutes.

Remove from the heat and allow to stand for 5 minutes, still covered.  Add the butter and stir until melted.  Add the lime juice, pineapple and cilantro.  Stir to combine & then add salt and pepper to taste.  Serve immediately.

Wednesday, April 11, 2012

Roasted Garlic Parmesan Asparagus

We just celebrated my youngests birthday yesterday. 

CANNOT believe he's 5! 

He is such a sweet boy who is obsessed with sports!  You just have to see this boy in action...he is amazing!  Especially when it comes to baseball.  So he has the perfect birthday...right during baseball season...he got a baseball tee, bat, ball, a baseball shirt and Colorado Rockies tickets for his birthday!

You should hear him rattle off his favorite Rockies players.  He especially likes Troy Tulowitzki (I don't know if I even spelled that right!) and Todd Helton.  He is often one of the 2 when up to bat.

He also is my green vegetable lovin' boy!  He especially loves broccoli and asparagus!  I know...weird.  What 5 year old likes those things?

We had this asparagus the other night and he ate his fair share of them.  And actually all the kiddo's liked them.  Yeah!

Roasted Garlic Parmesan Asparagus

1 1/2 pounds fresh asparagus
2 tablespoons olive oil
1/2 teaspoon seasoned salt
1/2 teaspoon garlic powder
1/2 teaspoon dried oregano
2 tablespoons shredded Parmesan cheese

Preheat oven to 425 degrees.  Line a cookie sheet with aluminum foil and spray lightly with cooking spray.

Wash asparagus, and cut off ends, if needed. Lay asparagus in a single line on foil.  Drizzle with the olive oil and then sprinkle on the seasonings. 

Roast in the oven for 10 minutes.  Take out and sprinkle with the Parmesan.  Return to oven and continue to roast for an additional 5-8 minutes.  You want the asparagus to be crisp-tender.

Wednesday, March 14, 2012

Glass Block Jello (and other St. Patty's Day food ideas)

It's so much fun to eat green on St. Patricks day!  It had always been a challenge for me to find the perfect "green" food for my family to eat (since they're not into the corned beef and cabbage thing!), but I now have the best St. Patty's Day dinner's that the kids LOVE!!
It's a pretty simple meal. 

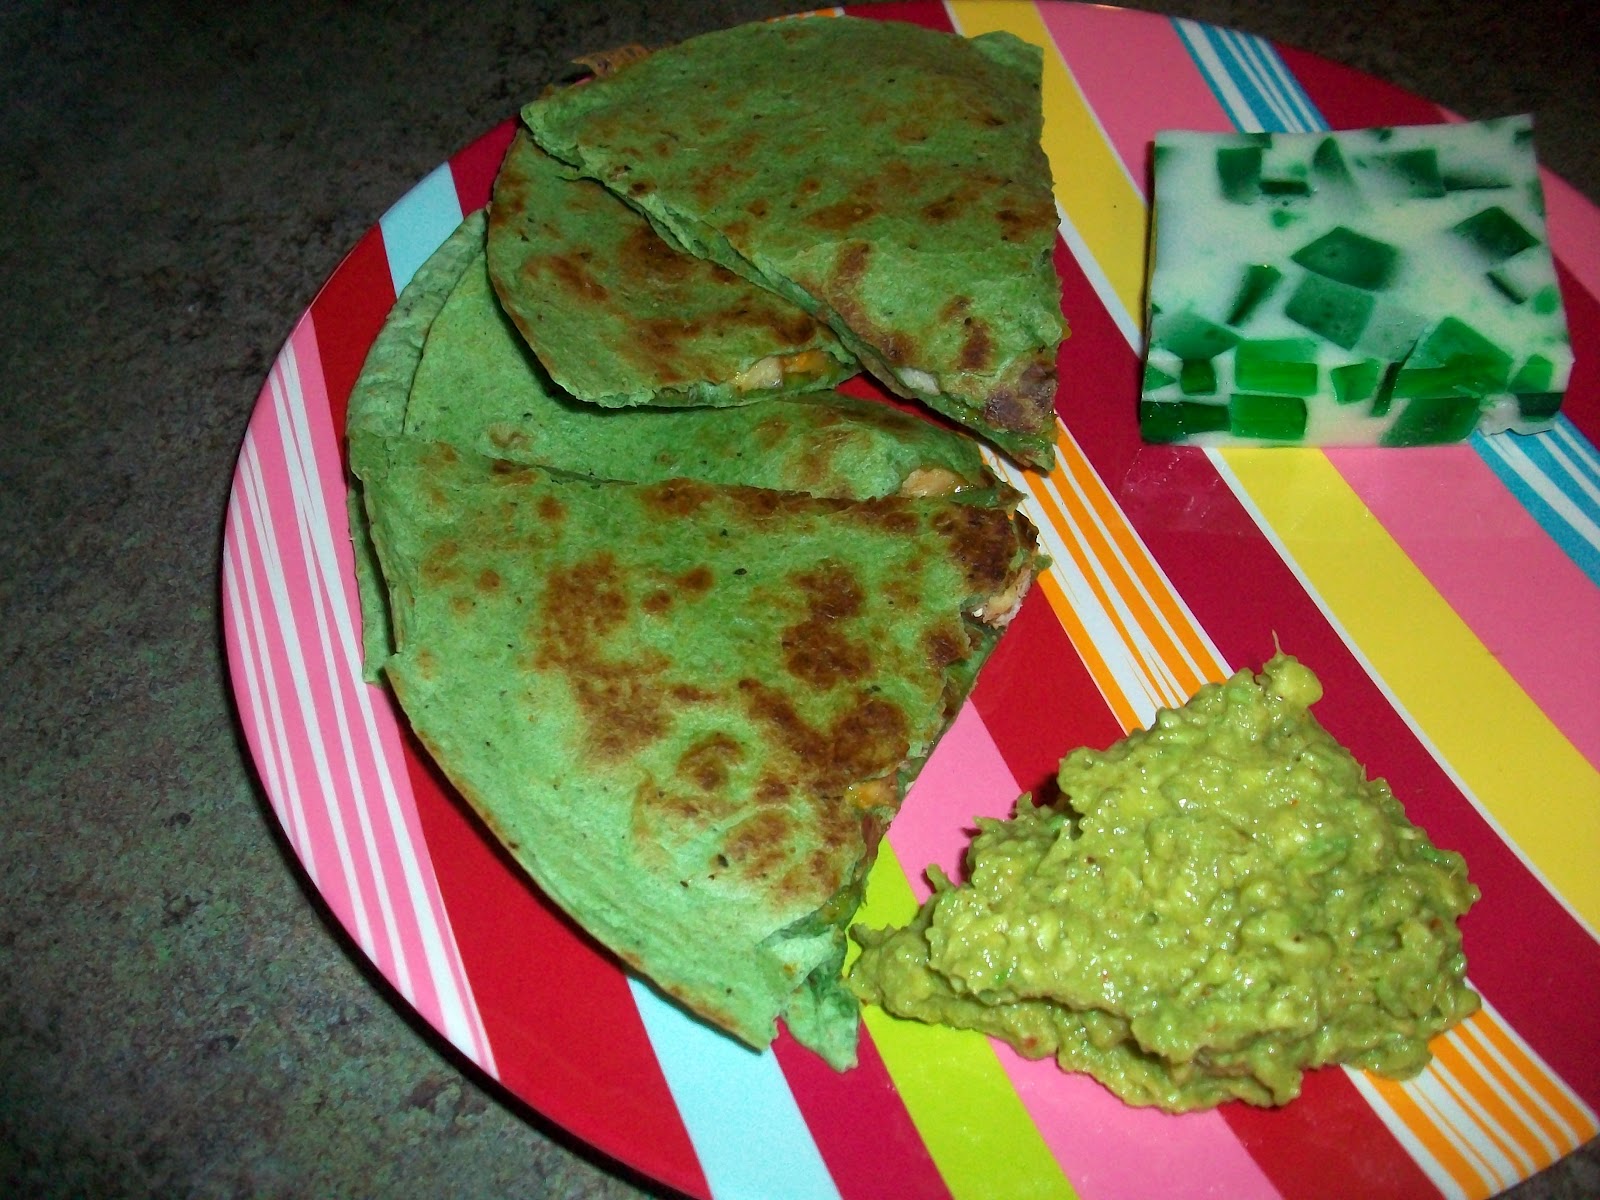
I make chicken quesadillas.  Of course we use the Spinach Tortillas (kid's can't even tell the difference) and then just fill them with shredded chicken and cheese.  Serve it with some Guacamole and sour cream, or with green salsa.
We then have a fun side to go with it.  You can just make it simple and have a green salad, or Pistachio Jello Salad, or the Glass Block Jell-O (the recipe you will get today!)

For drinks you can serve Frape or Lime Kool-aid.
And best of all...Dessert!  Here's a few of my favorites for you.  Mint Brownies, Jello Poke Cake, and Mint and Chocolate Chip Cupcakes.

Glass Block Jello
Recipe from Our Best Bites
Pin It
4 3-oz. packages lime Jello
2 packets unflavored gelatin (like Knox)
1 14-oz. can sweetened condensed milk
Spray 9 x 13 pan with cooking spray and set aside.

Bring 4 cups of to a boil. Combine the 4 packages of Jello with boiling water and stir until Jello is dissolved.  Pour into 9 x 13 pan and refrigerate for at least 4 hours, but overnight is better.
After your Jello is set, bring 1 1/2 cups of water to a boil.  In the meantime, sprinkle 2 packages of unflavored gelatin over 1/2 cup of cold water and allow it to stand for 4 minutes. 
When the water is boiling, pour it over the dissolved gelatin and stir to combine.  Add the sweetened condensed milk and mix well.  Let cool to room temperature.
Spray another 9 x 13 pan with cooking spray and set aside.

Cut the lime Jello into cubes and put them in the new 9 x 13 pan.  Pour the cooled milk mixture over the Jello.  Make sure they are all distributed evenly and that they are not sticking out of the milk mixture too much. 

Place in the fridge to chill overnight.  Cut into squares and serve to your little leprechauns!:)   (If you happen to have a four-leaf clover cookie cutter, that would be darling too!

NOTE:  This Jello can be made with any flavor and colors you would like.  Try red for Valentines, Red and green for Christmas, a variety for fun, etc.
Here's a picture of our St. Patty's Day meal last year....YUM!

Tuesday, February 28, 2012

Spanish Rice (budget dinner side or main dish)

If you need something really inexpensive to add to any meal, or to use as a meal with different sides, that tastes wonderful & is the most loved food that my 10 year old asks for almost every DAY....you've come to the right place!:)

This is a recipe we have already posted here, but since I started the Budget Dinners section I thought I'd introduce it again.  If you add the ground beef in you've got yourself a main dish.  Serve it with some tortillas and some fruit. 

My family loves rice and I love that they love rice cause it is really economical right now!  You'll be blown away by these numbers!

Oh, and incidentally, another reason I love this recipe.  MY HUSBAND MAKES IT!!  You heard me right!  This one dish he has mastered & it gives me a break from the kitchen!  What a perfect meal!:)

Spanish Rice
Budget Dinner Totals: Makes about 12 (1 cup) servings.  Without meat (as a side)=$2.59...that's 21 cents per serving!!  With meat (as a main dish)=$5.59 or 47 cents per serving!
Pin It
(pictured without meat)
3 cups rice (we use Jasmine rice...it has a nuttier taste and is perfect for Spanish rice)
1-2 Tablespoons oil
1/2 of a green pepper, chopped
1/2 of a yellow onion, chopped
1 lb. ground beef, browned(optional)
2 cans (small ones) tomato sauce
5 1/2 tomato sauce cans full of water
4 garlic cloves, chopped or pressed
1 teaspoon cumin
pepper and salt to taste
Put your rice in a large pot and place on the stove top. Add enough oil to coat all the rice.  Brown the rice and oil on medium high heat stirring frequently. The rice will start to turn white(er) than it already is and then it will start to brown. You don't want it a dark brown but a light golden brown and not all of the rice will brown, but when the majority is browned it is ready.  This is what gives the rice the wonderful texture that it needs, so don't skip this part!!!:)
Once the rice is ready add the remaining ingredients. The key to the salt is to taste the broth before you start timing the rice. It needs to be a little saltier than normal because the rice will soak up a lot of the salt. When it tickles your taste buds, bring it to a boil and then cover and simmer on low heat for 20 minutes. Enjoy with absolutely anything!!! We usually don't put in the meat if we are using it as a side dish, but sometimes Tony just likes to make it to eat as a meal in itself and he'll add the meat then (actually I think he would add the meat every time...It's me that doesn't think we need double meat at a meal!:))

Monday, February 20, 2012

Oven Roasted Brussel Sprouts

I've never had a problem with Brussels Sprouts.  I remember eating them growing up and liking them, so when I had the opportunity to try them out on my kiddo's I was really excited to see what they would think.  Well, guess what??  They all really liked them!  Especially my 4 year old Rhett who is a broccoli lover too (I know...weird!) 

And I have to say I think roasting is the way to go.  These really were delicious. (Never thought I'd say that when talking about Brussels Sprouts!)

Oven Roasted Brussels Sprouts
Pin It
1-2 pounds Brussels Sprouts
2-4 Tablespoons Olive Oil
1-2 teaspoons Kosher Salt
1/2-1 teaspoon black pepper
Freshly grated Parmesan cheese, optional

Note:  I know the measurements aren't exact, so you just need to adjust them to how many pounds of sprouts you have.  If you have 1 pound use the lower end of the ingredients, 2-the higher end, 1 1/2--the middle, not rocket science, but thought I'd clear it up.

Rinse Brussels Sprouts in cold water.  Cut the ends off and pull off any yellow outer leaves.  Place in a large Ziploc baggie or large bowl with a lid.  Drizzle the olive oil and sprinkle the salt & pepper over the Brussels sprouts.  Seal bag (or put lid on bowl) and shake until the sprouts are coated.  

Pour them onto a large cookie sheet in a single layer and bake in a preheated 400 degree oven for 35-40 minutes, or until tender on the inside & crisp on the outside.  The outsides will get black in places, but it's good!:)  If you feel inclined to add the Parmesan, (which I most often do!) sprinkle it on top now.

Pull out of oven and iIf you feel inclined to add the Parmesan (which I most often do!), sprinkle it on top now and serve immediately.  You can sprinkle a little more kosher salt over them before eating too if you'd like (I do that too...I like them salty!)

Enjoy!

Tuesday, December 6, 2011

Pomegranate Salad

I'm fighting some shoulder tension/pain right now and so I'm going to keep this one short & sweet!  (you're welcome:))

This is good...real GOOD.  It's so pretty and colorful and perfect for the holiday!  Don't let the raisins in it fool you, they are delicious in this (and I'm NOT a raisin lover!).  If you can't stand the idea of raisins you could substitute green grapes and just half them.  Enjoy!

Pomegranate Salad
PRINT RECIPE
4 to 5 Large Granny Smith Apples, or other TART CRISP apple variety (leave skins on, and slice in small chunks)
2 to 3 large pomegranates, with berries removed
1 to 1 1/2 cups GOLDEN Raisins
1 cup Sliced Almonds
1 Cup of Whipped Heavy Cream Whipped stiff & flavored with Vanilla and Powdered Sugar to taste.

Mix apples, berries, raisins & almonds together in large size bowl. Whip the cream until firm peaks form – add sugar & vanilla to taste. Mix whipped cream into fruit mixture. Serve immediately, or cover & keep in refrigerator until ready to serve.

Easy Peasy!:)

Wednesday, November 30, 2011

Creamy Mashed Potatoes

Have you ever been asked the question, "If you could only have 1 food for the rest of your life, what would it be?"  I have, and my answer has always been "potatoes".  But I'm going to change my answer to not just potatoes, but THESE potatoes!

I started making potatoes for our Thanksgiving meal and since I'm a wimp and don't really like mashing the potatoes I called in Tony (the hubby) to help me out.  (Chivalry is not dead!:))  In the process of mashing he added some "stuff" and boy was it some good "stuff"!!  I had to have him tell me in detail what he did so I could share these awesome potatoes with all of you!  The few little things he added really took these to over-the-top delicious status!  He's hired from here on out!

Creamy Mashed Potatoes
Pin It
About 5 pounds or so of potatoes
1/2 cup (1 stick) butter
1/2 cup whipping cream
1 package (8 oz.) cream cheese
1-2 teaspoons Mrs. Dash Garlic & Herb seasoning
salt and pepper, to taste

Peel and cut potatoes into 1" cubes.  Place in a large pot and cover the potatoes with water by about an inch or 2.  Bring to a boil and then time potatoes for about 20 minutes or until tender.  Drain water.  Put butter and cream cheese into a large bowl and then pour hot drained potatoes on top.  Mash potatoes until most of the lumps are mashed.  Add the whipping cream and mash until nice and smooth.  Add the Mrs. Dash, salt and pepper to taste and mix in. 

These are wonderful just plain like this...I even found myself sneaking into the leftovers and just eating them cold right out of the Tupperware!  They just call my name!:)

  They can be served with gravy and are really good that way too...you really can't go wrong with these!

Thursday, June 16, 2011

BLT Macaroni Salad


This would be a perfect side dish with any grillin' you might be doing for Father's Day!  (we had it with The Perfect Burger...SUPERB!!)  Anyway, this salad is really good...the hubby and kids loved it as well, which is saying a lot since Tony (the hubby) doesn't usually like pasta salads!  I think the bacon does it.  Anything with bacon in it gets a man's approval right??!:)


BLT Macaroni Salad
Recipe adapted from Taste of Home
2 cups uncooked elbow macaroni
3-4 green onions, finely chopped
1 large tomato, diced
1 1/4 cups diced celery
1 1/4 cups mayonnaise
5 teaspoons white vinegar
1/4 teaspoon salt
1/4 teaspoon pepper
1 jar (2.8 oz) Hormel Real Bacon Pieces

Cook the macaroni according to package directions.  Drain and rinse pasta in cold water until noodles are cooled.  Combine the macaroni, green onions, tomato and celery in a large bowl.  Combine the mayo, vinegar, salt & pepper in a small bowl.  Pour the mayo mixture over the macaroni mixture and stir to coat.  Cover and refrigerate for at least 2 hours.  (It's better when it's sat over night!)  Just before serving stir in the majority of the bacon, reserve a few pieces to sprinkle on the top of the salad when serving! 

Enjoy!!

Tuesday, March 29, 2011

Fiesta Pasta Salad

I told you I love salads this time of year!!:)  This is one of my favorites and I was surprised when I realized that I hadn't blogged about it yet!!  Well, I'm here to fix that!

Fiesta Pasta Salad
2 boneless, skinless chicken breats
1 box (12 oz.) bow tie pasta
1 can black beans, rinsed and drained
1 can corn, drained
1 can black olives, drained and sliced
1 1/2 cups cherry tomatoes, halved (or regular tomates diced)
4 green onions, chopped (white and green parts)
1/2 green pepper, chopped

Dressing:
1/2 cup oil
1/2 cup white vinegar
1 pkg. taco seasoning
1/3 cup ranch dressing

Cut chicken into bite size pieces and fry in a skillet in a little oil until browned and completely cooked.  Set aside.  Cook pasta according to package directions.  Drain (you do not need to rinse).  Put pasta in a large bowl.  Prepare all the vegetables and add to the pasta.  Then add the black beans, corn, olives, and chicken and then stir to mix. 

Make dressing by mixing oil, vinegar and taco seasoning together.  Whisk until combined and then add the ranch dressing and mix again.  Pour over the pasta mixture and stir until combined.  Let cool in the refrigerator for at least a few hours before eating (I always have to take a few bites before I put it in the frige...just can't help myself!). 
This is one of those salads that's even better the next day when it's had lots of time for all those flavors to combine and soak in to the pasta, veggies and chicken! 

I like to serve this as a main dish with some breadsticks to go with it and possibly a fruit (like grapes).  Perfect spring meal!! 

This is also a really good side dish!  You can serve it as a side as is, but if you have a meat main dish you could also just leave the chicken out of it and serve it as a side to your meat dish.  I've had it many times without the chicken and it's still delicious!!

Honestly, you're gonna love this one!

Saturday, March 19, 2011

Dream-sickle Jello

Here's another salad for you, this time a Jello salad! Jello salads are right up there with pasta salads for me. I just really like them! This one also just yells spring to me. It is so yummy and really does taste like a dream-sickle in jello form!

Dream-sickle Jello
2 small packages cook and serve lemon pudding
1 large package orange jello
Cool Whip

Cook pudding according to directions. Dissolve Jello according to directions. Stir pudding and Jello together while they are both still hot. When mixed thouroughly, pour into 9x13 inch pan. Let set. Overnight is best, but at least 6-8 hours. Top with Cool Whip.
So easy and so yummy!! My kiddo's absolutely LoVe this one too!

I've now tried this in raspberry instead of orange as well.  Keep all the ingredients the same except change out the orange jell-o for raspberry.  It was REALLY REALLY good!!  Don't know which I like better.  I've got strawberry on my list of next flavor to try!

Friday, March 18, 2011

Country Pasta Salad

I've been posting so many sweet recipes lately I figured it was time for something a little healthier!! This time of year I just love eating salads! I especially love pasta salads! This recipe is one that we used to eat growing up that I've always enjoyed. It's perfect for those spring days!

Country Pasta Salad
1 box (16oz) pasta (any kind, I used the tri color rotini)
1 1/2 cups Miracle Whip
1 teaspoon dill weed
1 can (about 12 oz.) chicken or tuna (you can use boneless skinless chicken breasts cooked at chopped instead if wanted)
1 cup matchstick carrot
1 cup celery, chopped
1 cup cherry tomatoes, halved (or regular ones chopped)
1/2-1 cup cucumber slices
1/2 c. frozen peas, thawed
(You can really use any vegetables that you like. I just put the carrots and tomatoes in mine this time, but I like it with the cucumbers and peas as well! I don't put in the celery because my family doesn't like it.)

Cook pasta according to package directions. While pasta is cooking, mix Miracle Whip and dill together in a large mixing bowl. When pasta is done drain and add to Miracle Whip and dill. Mix together well. Add rest of the
ingredients. Mix well and chill.

Monday, January 10, 2011

Skillet Scalloped Potatoes with Ham

My family LOVES potatoes. It's nice to find another way of making them other than mashed! I love scalloped potatoes but never think to make them until it's too late to because they usually have to bake in the over FOREVER!! Well, I found this recipe where you just make them in your skillet. It was so much faster and they were still super delicious!

Skillet Scalloped Potatoes with Ham

4 medium potatoes, pelled and thinly sliced
2 tablespoons butter
1/3 cup water
1/2 cup milk
2 to 3 tablespoons onion soup mix (I think 2 is enough)
3 tablespoons minced fresh parsley (I used 1 1/2 tablespoons dried parsley)
1 cup velveeta cheese, cubed or 1 cups grated cheddar cheese (I opted for the grated cheddar)
1 cup cubed fully cooked ham

In a large skillet, cook potatoes in butter until potatoes are lightly browned. Add water and bring to a boil. Reduce heat and cover and simmer for 14-15 minutes or until potatoes are tender.

Meanwhile, in a small bowl, combine the milk, soup mix and parsley; then stir in the cheese. Pour over potatoes. Add the ham. Cook and stir gently over medium heat until cheese is melted and sauce is bubbly.
Related Posts Plugin for WordPress, Blogger...