Thursday, February 28, 2013

Salted Caramel Chocolate Cupcakes

Kyla got inspired a couple weeks ago & this is the recipe that she came up with.  And I got to say...it's KILLER!!  We had some leftover cream cheese filling from this Strawberry Chocolate Cheesecake Trifle & she decided it would make a good filling for cupcakes.  Boy was she right.

We just had to come up with the perfect cupcake & frosting to go with it.  This is our favorite go-to chocolate cupcake recipe, and we decided a delicious salted caramel frosting would be an amazing combination!

Don't let the length of this recipe fool you.  They really are easy & pretty quick to put together.  The only time consuming part is waiting for the caramel to cool so you can use it in the frosting.  But that frosting is SO WORTH the wait!

Salted Caramel Chocolate Cupcakes


For the cake:
1 box devil's food cake mix
3 eggs
1/2 cup oil
3/4 cup buttermilk
3/4 cup sour cream
2 teaspoons vanilla

For the cream filling:
1/8 cup sugar
4 oz. cream cheese, softened
3/4 cup heavy whipping cream, whipped

For the Salted Caramel:
1 cup sugar
4 tablespoons water
2 tablespoons light corn syrup
1/2 cup heavy cream
2 tablespoons butter
1/2 teaspoon lemon juice
1/2 teaspoon kosher salt

For the frosting:
2 sticks butter, at room temperature
8 ounces of cream cheese
3/4 cups powdered sugar
1 recipe salted caramel 

To make the cupcakes:

Preheat oven to 350 degrees.  Line 2 muffin tins with 24 cupcake liners. 

Mix the cake mix with the rest of the cake ingredients until nice and smooth.  Fill liners 3/4 way full with batter.  Use large cookie scoop to make this easier. 

Bake for 15-20 minutes or until a knife inserted comes out clean.

Let cupcakes cool completely on a wire rack.

To make the Cream Cheese filling:

Beat cream cheese and sugar until light and fluffy.  Fold in the whipped cream until combined.

Using a serrated knife, cut a hole in the middle of your cupcake.  My kids love to eat the cut out part...what a treat!:)  Spoon cream cheese filling into the cupcakes until it is flush with the top of the cupcake.

Now to make the Salted Caramel for the frosting:

Combine the sugar, water and corn syrup in a large saucepan and stir over medium heat with a wooden spoon until the sugar is dissolved.  Increase heat to medium-high and bring to a boil, stirring occasionally.  Continue to cook until the caramel turns an amber color, stirring occasionally so it doesn't burn.  Remove from heat.  Slowly pour in the heavy cream.  Be careful because it will bubble up and it is very hot!  Stir until combined.  Add the butter, lemon juice and salt and stir to combine.  Allow to cool until warm to the touch and until it's thick like molasses.

And on to the frosting:

Beat the butter and cream cheese until creamy, about 3 minutes.  Add 2 cups of the powdered sugar and beat to combine.  Add the salted caramel and again beat to combine.  Add the additional powdered sugar until you reach your desired consistency.

And finally...pipe frosting onto cupcakes.  Add any sprinkles you would like, or eat them without any! (that is my husbands preference...he doesn't like anything with sprinkle!)


Have mercy!!

Recipe for salted caramel frosting adapted from Blooming on Bainbridge

Monday, February 25, 2013

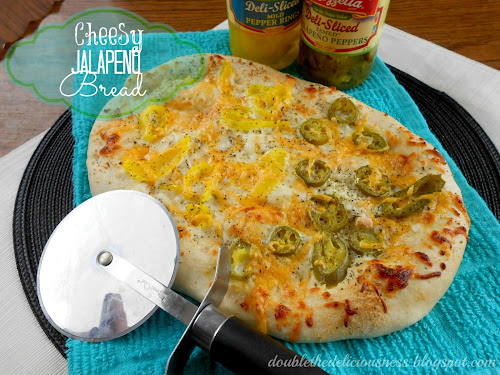
Cheesy Jalapeno Bread

I grew up in a small town where we had a Maverik gas station.  It was the happenin' place!  (Yes, I know it's a gas station...we hicks had to have something to do!:))  I've never been a big soda drinker, so when everyone else went to get their soda fix, I was buying their cheesy bread.  It wasn't until I married my husband, who likes all things spicy, that I started to appreciate the jalapenos.  I'm still a wimp, but I love the taste, so I go for it!

We moved away from home 10 years ago and guess what?  No Maveriks around anymore...until about a month ago.  YES...we now have a Maverik in our home town!  (You wouldn't believe the excitement that a new gas station has caused...I guess we're a bunch of hicks here too!:))  Anyway, I was reminded of this bread again after my 5 year old begged for about a week to go to "the Maverik".  He was in heaven...he wanted to try everything, but settled for an orange slushie.  I of course got some cheesy jalapeno bread.  It wasn't as good as I remembered it, so I decided I'd make my own.

Now this recipe is a lot like how I remember the stuff...soft & cheesy!

Cheesy Jalapeno Bread


For the bread: (makes 2 loaves)
1 1/2 cups warm water
1 tablespoon yeast
1 tablespoon sugar
3-4 cups flour

Toppings:
2 tablespoons olive oil
1 teaspoon garlic powder
1/4 cup Parmesan cheese (powder stuff)
1 cup grated mozzarella cheese
1/4 cup grated cheddar cheese
1 teaspoon Italian seasoning
banana peppers
jalapeno peppers

Place warm water, yeast and sugar in a mixer.  Let sit for about 10 minutes or until yeast is bubbly.  Add 2 cups of flour and mix until smooth.  Add remaining flour until dough comes together.  It should be soft and just a little sticky to touch.

Take half of the dough and roll it out into an oval about 1/4 inch thick.  This by no means needs to be perfect!  Transfer to a greased cookie sheet.


Spread half of the olive oil onto bread, just enough to lightly coat the bread using the back of a spoon.


Sprinkle half of the garlic & Parmesan cheese over the oil.


Now take half of the mozzarella and spread over the garlic/Parmesan mixture.  Top with your pick of banana peppers or jalapenos.  We like both!  And I like to use the "tamed" jalapenos which still have a kick to them I think, but if you like the heat go for the regular ones!  


Now sprinkle the cheddar cheese over the peppers and then the Italian seasoning over that.


Bake at 425 degrees for 12-15 minutes or until cheese is melted and bread is starting to brown.

Cut into strips using a pizza cutter & dig in!  We also like to just rip pieces off when it's cooled just a little...oooohhhh mmmmmm!!:)

This recipe makes 2 loaves, so start the whole process over with the other half!  They are also scrumptious with olives on them!  Just FYI.

Wednesday, February 20, 2013

Pepper Jack Pulled Pork Ciabatta Sandwich

My favorite thing to do with shredded meats is to make sandwiches out of them.  But it has to be made on a ciabatta roll!  They are my absolute favorite...and they sell them (at least at Walmart) in mini's...so much fun! (Check out our Turkey Ciabatta Sandwich that is to die for as well!)

This is an easy wonderful meal that even my kid's enjoyed.  The pork is cooked in the crock pot all day so it is so nice and tender when you're ready to throw the sandwiches together.  You will probably end up snagging a few bites in the process!:)  We love that they can be made to order.  Some of my family didn't want onions, some didn't want avocados, some wanted colby jack cheese instead of pepper jack, etc.

Pepper Jack Pulled Pork Ciabatta Sandwich
PRINT RECIPE
 
 
2 lbs boneless pork roast
1/2 cup chopped onion
1 can (14.5 oz.) beef broth

Ciabatta Rolls
1 can (small) refried beans (I used fat free)
1 packet taco seasoning
pepper jack cheese, sliced thin
red onion, thinly sliced
avocados, sliced
dijon mustard

Place roast, onion and beef broth in crock pot.  Cook on low for 6 to 8 hours.  Shred the pork using 2 forks in the crock pot...it will pretty much fall apart for you!  Leave it in the crock pot until ready to use on warm.

 To prepare your sandwiches, mix the refried beans with the taco seasoning.


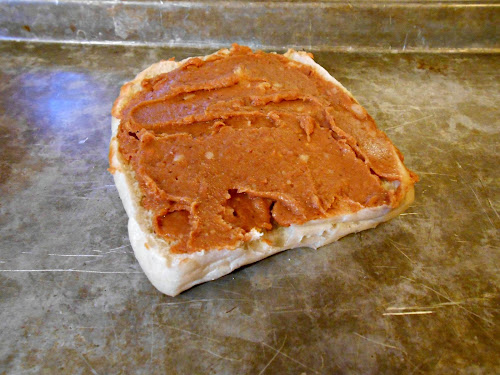
Spread refried bean mixture on the bottom of your ciabatta rolls.  Place on large cookie sheet.


Place a nice amount of pork on top of the beans and then top with onions and avocados.


Place enough cheese to cover the toppings.  (These were all made with colby jack cheese, but I think the pepper jack is AMAZING on these!!)  Add the tops to the cookie sheet as well.


Place under the broiler in your oven for 1-2 minutes.  Watch them closely, you just want the cheese to be melted, not burned!:)

Remove from oven and slather some dijon on the tops of the ciabatta rolls and smoosh together.

Now feast...!!
(Pictured below is colby jack cheese made on an onion/poppyseed ciabatta roll!)


Recipe adapted from Six Sisters Stuff

Tuesday, February 12, 2013

Valentine Pretzel Bites

These little buggers are so addicting!  They are so not good for me to have around my house, I cannot stop eating them!  They are a perfect teacher treat for Valentine's Day or for a snack for a classroom party.  We put them in little plastic bags for my son to hand out with his valentines...he forgot, so I had a nice snack after school!:)   (We have the week off of school (YEAH!) so my kid's had their Valentines class parties last Friday.)
They are really easy to make & everyone will enjoy them, so whether you make them for yourself, your family or for Valentine parties, they will be a hit!

Valentine Pretzel Bites
1 bag small twist pretzels
2 bags hugs
1 bag Peanut butter M&M's

Preheat oven to 300 degrees. 

Place pretzels on a large cookie sheet in a single layer.  Unwrap hugs and place one on each pretzel.  Place in the oven for about 5 minutes or until hugs are shiny and melty.  Remove from the oven.

Press an M&M on top of each hug. 


Let sit at room temperature until hugs harder back up.  This usually takes quite a few hours.  If you're in a rush place them in the fridge or freezer to speed up the process.  I usually just make them the night before I need them and then they're ready to go in the morning.

NOTE:  These can be made with regular or Peanut M&M's as well, but I like the peanut butter the best.


Tuesday, February 5, 2013

Creamy Corn Chowder

I saw a squirrel this morning on my way to work.  (I just had to shout "squirrel" to my kids out of the blue...we love UP!:))  It was just sitting on a post basking in the sun.  Made me all giddy inside...I'm hoping that's a good sign that spring is right around the corner!

BUT...before spring gets here, and all you want to make is sandwiches, salads, wraps & quesadillas (anyone? anyone else??) you've got to give this chowder a try.  It's one of my favorite soups...it is so creamy you'd never know it is made with skim milk!  And it has potatoes & bacon in it...pretty much perfection right there!

(You may recognize this recipe...it is one I shared over at Or So She Says last November...I needed it here as well!!!:))


Creamy Corn Chowder


1 package (12 oz.) bacon
4 tablespoons butter
1/2 cup flour
2 cups water
5 cups milk (I use skim...still creamy!)
4 large red potatoes, diced into bite size pieces
1 large onion, diced
4 garlic cloves, pressed or minced
1 package (16 oz.) frozen sweet corn kernels
Tabasco sauce
salt and pepper

Cook the bacon until crisp and then transfer to a paper towel lined plate to cool.

Melt butter in a large stock pot or sauce pan.  Add the flour and stir until it starts forming little balls of dough.  Slowly add the water while whisking.  Whisk until there are no clumps.


Add the milk and bring to a boil over medium heat, stirring frequently.


Turn heat down to low and then add the potatoes, onions and garlic.  Let simmer for 20 minutes or until the potatoes are tender, stirring frequently.


Crumble the bacon and then add it to the soup along with the frozen corn.


Stir all together and heat through.  Add a few drops of Tabasco and salt and pepper to taste. 


Serve with extra bacon & cheddar cheese on top if desired.


Friday, February 1, 2013

Groundhog's Day Pudding Treat (Punxsutawney Phil)

When I saw these I knew I wanted to make them for my kiddos classes for Groundhog's Day. And since Groundhog's Day falls on Saturday I am taking them into their classes this afternoon.

I've got to say, they really turned out cute.  They were a little time consuming, but that's one of my joys in life.  I love to listen to music at night after all the kids are in bed & work.  Not cleaning, mind you, it has to be something fun & cute like these.:)

Eli & Rhett helped me with the pudding and "dirt" but then they were sent to bed so I could relax with Punxsutawney!  We had a fun night together!:)

This would be a great Groundhog's Day activity for any of you wanting something fun to do for this looked-over day.  (I always get the shadow thing all messed up...I always think that if he sees his shadow be an early spring, but I've got it all backwards.)


Groundhog's Day Pudding Treat

 
Chocolate pudding (store bought in the cups or make your own and put in small clear cups)
Oreos, crushed (I blend mine in my blender)
Pepperidge Farm Milano cookies
Peanut Butter chips
Sliced almonds
Chocolate frosting (store bought or homemade)

To make Punxsutawney Phil:
Cut Milano cookies in half.  It's easiest to use a small serrated knife, this tends to help so the cookie doesn't crumble.  Pipe frosting using a small round tip (I used Milton 5) onto the top of the cookie where the ears will go.  Slice an almond in half and place on frosting for ears. 

Next, pipe frosting for the eyes and nose.  With your knife, cut a sliced almond into small strips.  I turned my almond horizontal and sliced it that way.  Some of the teeth were kind of long, but they looked really cute and silly!  Stick the teeth up the nose...that's literally what you feel like your doing!  You don't want to place them on top of the nose or it will look funny, so just pretend your shoving them up pretend nostrils!:)


Turn your peanut butter chips on their side and shave off the tip with a knife so they will lay flat.  Pipe a little frosting on where the cheeks should go and then press on the peanut butter chips.  And there you have a Punxsutawney Phil!

To asssemble:
Place about 1 tablespoon crushed oreos on top the pudding.  Add Punxsutawney Phil and press into the "dirt" until you can't see the cut edge.


Enjoy your Groundhog's Day...here's hopping for spring!:)
Related Posts Plugin for WordPress, Blogger...