Friday, August 31, 2012

Lemon Brownies

It's a LONG weekend!  And it couldn't have come at a better time!!
 
I'm tired.
 
A good fun-filled, no responsibility weekend is just what I need.  This school stuff is wearing me out, and it's only been 2 weeks! 
 
I'm thinkin' some good ol' last days of summer fun with my family is in order.  Sleep in and then go and do at our own pace....YES PLEASE!!
 
And of course we'll add some wonderful foods into the mix.  What's Labor Day weekend without some grillin'??  Here's some great grillin' recipes for you.  And of course you'll need a dessert that screams "end of summer".
 
So here you go!
 
These are definately the best chilled.  And if you can, make them the day before you want to serve them.  They just get creamier & creamier!  Just don't let them go too long or you'll have something pretty gross on your hands!:)
 
Lemon Brownies

1 stick butter or margarine, melted
1 box lemon cake mix
4 eggs, divided
8 ounces cream cheese, softened
3 1/2 cups powdered sugar
1 1/2 teaspoons lemon extract
Additional powdered sugar (optional)

Lightly spray a 9 x 13 cake pan with cooking spray. 
 
Mix melted butter, cake mix, and 1 egg together.  Spread onto the bottom of the greased pan.  This can get a little tricky, since the cake mixture is sticky...just do your best, it doesn't need to look pretty just make sure it covers the entire bottom of the pan.

Beat together the cream cheese, powdered sugar 3 eggs & lemon extract until smooth. Pour over cake crust in cake pan.
 
Bake at 375 for 35-40 minutes or until golden brown on top. Watch it closely near the end so it doesn't burn.
 
Let cool before cutting.  Store in the fridge.


Thursday, August 30, 2012

Sweet & Sour Chicken

Remember that Fried Rice we posted from a couple of days ago?  Well, here's the perfect main dish to accompany it!
 
This chicken is a little messy to make, at least for me, because I like to coat the chicken with my hands...it's just so much easier!  But if that grosses you out, you are more than welcome to use whatever utensil you have to help you out.
 
I've realized that most of my recipes are gauged by whether or not "the kid's liked it".  What can I say, I'm a Mom who likes to feed her kids stuff they like (forget about the soup debacle!)  Just in case you didn't catch it, I was typing that last sentence laced with sarcasm.  My kid's eat what I fix or they go hungry.  Mom of the year right here!  I am very blessed that I don't have picky eater children....life would be so bland!
 
Which is NOT at all a word you could use to describe this chicken.  It's just a tad addicting too, so watch out!
 
Sweet & Sour Chicken

4 large boneless skinless chicken breasts
salt & pepper
1-1 1/2 cups corn starch
3 eggs, beaten
1/4 cup canola oil

The sauce:
3/4 cup sugar
4 tablespoons ketchup
1/2 cup white vinegar
1 tablespoon soy sauce
2 teaspoons garlic powder

Preheat oven to 325 degrees.

Heat oil in a large skillet over medium-high heat.  While your pan is heating, prepare the chicken by rinsing the chicken breasts in cold water and trimming off any fat.  Cut chicken into cubes about 1" in size.  Sprinkle with a little salt and pepper.
 
 
Place corn starch and beaten eggs in small bowls.  Make an assembly line to your pan.  Starting with the chicken farthest from your pan, then the corn starch and then the eggs.

 
First place the chicken in the corn starch and mix around until coated.

 
Then place in the egg mixture and coat.  This is where it gets messy for me.  By the time I'm done with all the chicken my fingers are 3 times their size because they are coated as well!:)

 
Now throw that chicken into your hot oiled pan.

 
Cook chicken stirring occasionally until it the outside is browned but not cooked through.  Place in a 9 x 13 greased baking pan.

 
Mix all the sauce ingredients together & then pour over the chicken pieces.

 
Bake for 1 hour, stirring every 15 minutes.  I set my timer for 15 minutes or else I forget to stir, and just keep doing that for 1 hour.:)  The sauce will thicken towards the end of the cooking & you'll have an awesome dish that your family (or whomever you are making it for) will LOVE!!


Tuesday, August 28, 2012

Fried Rice

I think my family would be good for life if we just ate rice for every meal.  They love Spanish Rice & Hawaiian Haystacks, and this Fried Rice!
 
You really can't mess up this rice either, and you can totally play around with it.  Throw in some green onions or some chopped ham, whatever vegetables you like and it will still be delicious!  I usually use frozen mixed vegetables in ours because I always seem to have some of that on hand, but you can use whatever you like.  I think fried rice needs to have at least peas and carrots in it, but that's just me...do what you like.:)
 
This recipe makes quite a bit of rice, I'm going to say about 5-6 cups.  But we love it because (like I said in last weeks post) it's perfect for lunches for the middle schoolers who have access to a microwave at lunchtime.  But feel free to half the recipe if needed.  Also, we love to use Jasmine rice, but you could use any rice that you perfer.  Brown works wonderfully as well!
 
Fried Rice
(Budget Dinner: the entire recipe cost only about $3.20!  That's 53 cents per 1 cup serving!)
PRINT RECIPE
 
2 cups uncooked rice
3 tablespoons olive oil
1 cups frozen vegetables, thawed (your choice but make sure you have peas and carrots!)
1 small onion, chopped
2 teaspoons minced garlic
3 eggs, beaten
1/2 cup soy sauce

Cook rice.  You can use leftover rice or you can cook the rice ahead of time if desired.  I usually just cook my rice right along with this recipe.  I use my rice cooker and it takes about 20 minutes to have my jasmine rice ready.  If you are using brown rice it will take longer.  Set aside.

Heat oil in large skillet over medium-high heat.  Add the thawed vegetables, onions and garlic and saute until tender, about 3-5 minutes. 

Turn heat down to medium low.  Push the veggie mix to one side of the skillet & then add the eggs to the other side and fry them until scrambled.  Add the rice and soy sauce and mix all ingredients together.  Stir and cook until heated through.


Thursday, August 23, 2012

Summer Veggie Ziti Bake

If you're like anyone else I know who raises squash & zucchini in their garden, you have it coming out your ears!  It's always been hard for me to think of what to make with it besides zucchini bread and to fry it up in olive oil as a side...until this recipe.  We will make this every August/September when the squash is in season.  It's a great way to use a little of your garden veggies, and even your kids will like it!  Only 1 of my 4 picked the squash out and just ate the noodles.:)
 
This makes A LOT, so you could half the recipe if desired.  But my middle schoolers who have access to a microwave during lunch have been enjoying it the last couple days!  You can also substitute fresh herbs if you have them.
 
Summer Veggie Ziti Bake
16 oz. box ziti pasta, uncooked
3-4 tablespoons olive oil
4 cups chopped yellow squash (about 3-4 small)
2 cups chopped zucchini (I used about 1/3 of a large one)
1 onion, chopped
2 cups chopped tomato
2 teaspoons garlic powder
2 cups shredded mozzarella cheese, divided
2 tablespoons basil
2 teaspoons oregano
1 teaspoon kosher salt
1/2 teaspoon crushed red pepper
1 cup part-skim ricotta cheese
3 eggs
 
Preheat oven to 400 degrees.
 
Cook pasta according to package directions.
 
While pasta is cooking, prepare your veggies. Heat oil in a large skillet over med-high heat. Add the squash, zucchini and onion. Saute for 5 minutes.
 
 
Add the tomato and the garlic & cook for another 3 minutes.


Remove from the heat and then stir in the pasta. 
 
 
Add 1 cup of the mozzarella, the spices and salt & pepper.
 
In a bowl, combine the ricotta and eggs. Mix together.  (Yes I am aware there is only 2 eggs in the photo...I added another egg and more ricotta cause it seemed to dry for my liking!:))
 
 
Stir cheese/egg mixture into the pasta mixture. 
 
 
 Then pour into a greased 9 x 13 pan. Sprinkle with the remaining mozzarella.
 
Bake for 15 minutes or until the top starts to brown & it is warmed through.

Tuesday, August 21, 2012

Lemon & Orange Pull Apart Bread

Dropped my baby off at his first day of Kindergarten this morning.

So...to deal I figured I'd better bake something.

Baking is my emotional heal-all coping mechanism.  The end product is just a bonus!  And this recipe combines some of my favorite things.  Lemon, orange, cream cheese, and bread!!  How could it go wrong?

It didn't!! 

But I did miss my little helper.  I kept hearing him in my mind: "Mom can I put that in?" " Mom can I lick that?" "Mom I love you so much you are the best Mom in the world & you make me the most wonderful things!"  (Ok, that last one was just a figment of my imagination...just dreamin'):)

Anyway, these are awesome gooey yumminess.  There may not be any left for the kids for after school, but what they don't know won't hurt them right??:)

Another bonus: all the baking, taking pictures, and blogging has keep this little Momma occupied so I don't go curl up in my closet and cry! 

Can't wait to see how his 1st day of Kindergarten went!!

Lemon & Orange Pull Apart Bread
Dough:
2 1/2-3 cups flour
1/4 cup sugar
2 tablespoons yeast
1/3 cup whole milk
1/4 cup butter
1/4 cup water
1 1/2 teaspoons vanilla
2 large eggs

Lemon Orange Sugar Filling:
1/2 cup sugar
zest from 3 lemons
zest from 1 orange
4 Tablespoons butter, melted

Cream Cheese Glaze:
3 ounces cream cheese, softened
1/3 cup powdered sugar
1 tablespoon whole milk
1 1/2 tablespoons fresh lemon juice

Mix 2 1/2 cups flour, sugar, and salt in a bowl; set aside.

Heat the milk and butter in the microwave for about 1 minutes or until the butter is melted.   Pour into mixer and allow it to cool a little (about 5 minutes).  Add the yeast, water and vanilla and mix to combine. Let sit for 10 minutes.  Add eggs and half of the flour mixture and beat until smooth.  Add the remaining flour and mix.  Add more flour if needed.  The dough should be sticky, but smooth.  Place dough in a bowl that has been sprayed with cooking spray.  Cover with a towel and let raise until double, about 45 minutes.

It should look like this after it has raised.


Mix the sugar with the lemon and orange zest.  This is my absolute favorite part...it smells so good I have a hard time not just eating the zest!!:)


Grease a 9" x 5" loaf pan with cooking spray.  Set aside.

Flour your surface and begin rolling out your dough into a rectangle.  It needs to be quite thin & approximately 20" by 12".  A ruler is a good help in this step if you're anything like me!


Melt the butter and pour over dough.  Using the back of a spoon or a pastry brush smooth the butter over the entire surface of the dough.


Using a pizza cutter, cut the dough into 12" by 4" strips, like shown.  As you can tell they are not exact...just try to keep them about the same. 


Place 1/5th of the sugar/zest mixture on one of the strips of dough.  Using your finger (yes this is a little messy, but your fingers work the best!) spread the zest all over the strip of dough. 

Stack the next strip on top of the zest covered one and put another 1/5th of zest on top and smooth out with your fingers.


Keep going until you have all 5 strips staked on top of each other.


Now take your knife and cut the stack into 2" sections, and place into greased loaf pan with the cut side up.


There will be 6 (or 7, depending on how accurate your rectangle was to begin with...mine was 7:)) stacks altogether.  Just keep stacking them into the loaf pan until it looks like this.


Cover lightly with saran wrap and let raise again for about 30 minutes or until about doubled in bulk.  Here's how it will look when it goes in the oven...YUMMY!!


Top view without the saran wrap...Oh My!


While it's raising, go ahead and preheat your oven to 350 degrees.
Bake for 20 minutes and then pull it out of the oven.  It is not done yet, but should be getting pretty browned on the top, as shown here...


Cover it loosely with tinfoil and put it back in the oven to cook for another 10-15 minutes.  This will help it from getting too browned (or black)!!


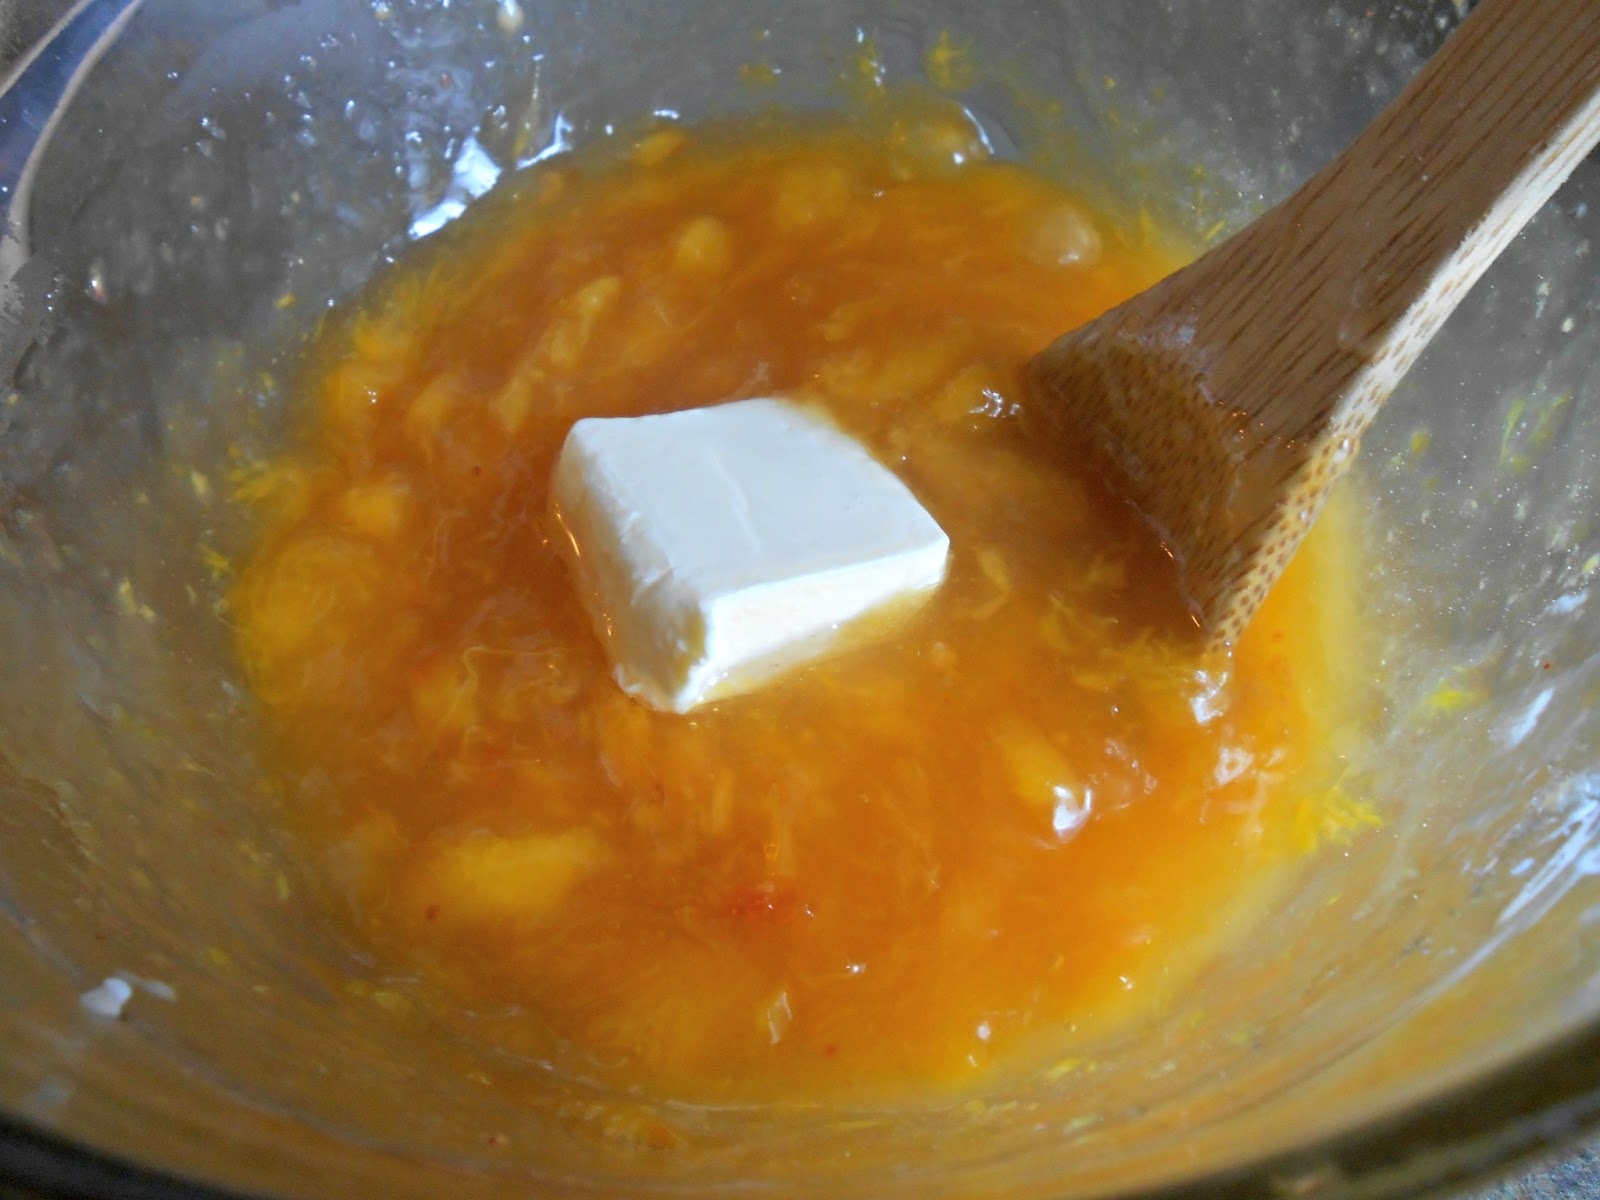
While it is baking the last few minutes, whip up the cream cheese icing.   In a small bowl combine the cream cheese and powdered sugar and mix together until smooth.  Just keep smashing the cream cheese with the back of a wooden spoon.  Add the lemon juice and milk and stir until smooth.  If you have a few small lumps don't worry too much about it...it will look fabulous on the bread!


Pour over the bread and smooth it all over while the bread is still hot. 

Let sit in pan for 10 minutes and then you can dig in!  Delicious!


Wednesday, August 15, 2012

Mom's Fresh Peach Pie

This is absolutely the one thing I most look forward to about peach season.

My Mom's fresh peach pie.....*sigh*

I really just want to lick to computer screen as I upload all these pictures.  Probably wouldn't taste the same though...:)

I've got this recipe on here already, but I thought it deserved an encore performance!  And this time I'm going to take you through ALL the steps from start to finish. 

Are you ready?  Let's go!

Mom's Fresh Peach Pie
 
9" baked pie shell, cooled
5-6 large peaches
1 cup sugar
3 heaping tablespoons corn starch
1/2 cup water
2 tablespoons butter
1/2 teaspoon almond extract

Take 3 large peaches and wash and peel them.  Slice peaches into the bottom of your pie crust.


Sorry for that ugly pie crust...I ended up buying one and I poked it to death with a fork and it still bubbled up & shrank like crazy...so I recommend the recipe linked above!:)

Next, mash 2-3 peaches, depending on size.  I usually mash 3 medium sized peaches.


Add the sugar, corn starch & water...you need heaping tablespoons of the corn starch like this:


Then mix it all together.  It will look like this when your done. (Not very appetizing YET!!)


Thicken in the microwave.  Mine usually takes 6 minutes all-together.  Make sure you stir it after every 2 minutes.  You will know when it is ready because it turns from a watery milky-looking mess to a beautiful translucent pie filling!


That's it baby!:)

Now add the butter and almond extract.  Do not skip the almond extract...it MAKES this pie what I love.  It's not too much that it's overpowering, it's just the perfect amount!


Pour the thicken pie filling over the cut up peaches.


Refrigerate until set & cooled.

My husband really likes it with a little bit of whipped cream on top.  I think it stands on it's own...there is no need for the whipped cream, but to each their own!  I do however think it is awesome with a scoop of vanilla ice cream...not on top, but just on the side. 

I know you will enjoy this one!


Monday, August 13, 2012

Strawberry Peach Jam

We've got a couple of delicious fresh peach recipes for you this week.  They will tickle your taste buds for sure!:)

It's peach season here & we are so lucky to live in a peach valley!  We can get some of the best peaches around, I dare say.  I love canning them & making jams & pies, etc.  But I really just love a nice big juicy fresh peach.  The kind where the juices run down your face.  YUM!

This jam is delicious.  The strawberry & peach go together so perfectly.

Try it on some toast, PB&J, or it is fabulous on pancakes!

Strawberry Peach Jam
1 1/4 cup mashed strawberries
2 cups finely chopped peaches
1/4 cup lemon juice
1 (1.75 oz) box Pectin
4 1/2 cups sugar
1 cup light corn syrup

Wash strawberries, remove, stem and mash them with a potato masher until coarse.  You still want a few chunks in there.  Wash and peel peaches.  Chop with a knife into small chunks.  Add the peaches to the strawberries and stir to combine.

Add the lemon juice and stir.  Sprinkle box of pectin over fruit and then stir really well.  Let fruit mixture sit for 30 minutes, stirring every 5 minutes or so. 

Pour in the corn syrup and mix well.  Gradually pour in the sugar and stir until sugar is dissolved and it is no longer grainy.  You may want a second set of hand to help you with this part.  It takes a little bit of time & my arm felt like it was about to fall off by the time it was ready!  Just a heads up...but it's worth it!

Pour jam into freezable containers, 1-2 cups size, leaving about 1/2 inch room at top to allow for expansion while in the freezer.

Let sit on the counter for 24 hours and then either refrigerate & use within 3 weeks or freeze for us to 1 year.  Makes about 7 cups.

Related Posts Plugin for WordPress, Blogger...